
Floor Plan Dashboard
The dashboard can be accessed from a site context or an access point context. You can view the floor plan dashboard in view and view. By default, the floor plan for a site is displayed in the summary view.
The following table describes the options displayed in floor plan dashboard in the summary view.
|
Data Pane Content |
Description |
|---|---|
|
|
Allows you to search the floor names and APs. |
|
|
Allows you to add a new floor. |
|
|
Allows you to edit or modify the floor plan properties. |
|
|
Allows you to delete a floor plan. |

The following table describes the information displayed in each column of the table in the list view.
|
Data Pane Content |
Description |
|---|---|
|
|
Displays the floor number. Use the sort option to sort the numbers in ascending or descending order. |
|
|
Displays the name of floors. Use the sort option to sort the floor names in ascending or descending order. Use the filter option to select a specific floor name. |
|
|
Displays the number of APs (deployed AP, planned AP, and air monitors) associated with the floor. Use the sort option to sort the APs in ascending or descending order. |
|
|
Displays the number of clients associated with the floor. Use the sort option to sort the clients in ascending or descending order. |
|
|
Displays the width of the floor in meter/feet. |
|
|
Displays the length of the floor in meter/feet. |
|
|
Displays the ceiling height of the floor in meter/feet. |
|
|
Allows you to add a new floor. |
|
|
Allows you to edit or modify the floor plan properties. |
|
|
Allows you to delete a floor plan. |
You can either navigate to a specific site to view the floor plan or view a specific site floor plan from the tab in the context.
To view the dashboard from the tab in the context, complete the following steps:
- In the app, set the filter to .
The global dashboard is displayed.
- Under > , the page is displayed.
- Hover over a site to view the following details:
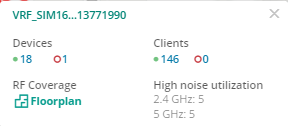
Figure 1 Site-level Details with Floorplan Option
- Click under . By default, the dashboard with all floors is displayed in the summary view.
- Click any one of the floor tile under to navigate to the floor plan. To go back to the all floor tiles, click the back arrow next to the floor name.
- To view all floors in a list, click the view.
A table with a list of floors is displayed in the list view. - In the table, click any one of the floor under column or enter the floor name in the column and then click the floor name to navigate to the floor plan to navigate to the floor plan. To go back to the floor list, click the back arrow next to the floor name.
To view the dashboard from a site context, complete the following steps:
- In the app, set the filter to one of the options under .
The dashboard context for the selected site is displayed.
- Under > , click . By default, the dashboard with all floors is displayed in the summary view.
- Click any one of the floor tile under to navigate to the floor plan. To go back to the all floor tiles, click the back arrow next to the floor name.
- To view all floors in a list, click the view.
A table with a list of floors is displayed in the list view. - In the table, click any one of the floor under column or enter the floor name in the column and then click the floor name to navigate to the floor plan.
- To download the bill of material, click under window.
- To go back to the floor list, click the back arrow next to the floor name.
To view the dashboard from an access point context, complete the following steps:
- In the app, set the filter to .
The global dashboard is displayed.
- Under , click > .
A list of access points is displayed in the view.
- Click the name to view the page. If there are many APs connected to the network, click or to filter the online or offline APs.
- Additionally, enter the access point name in the column and then click the AP name. The AP page is displayed.
- Under > , click . The floor plan details with the highlighted AP is displayed.
- Click anywhere on the floor plan to navigate to the exact floor for a site with the AP highlighted. By default, the window pops up displaying the highlighted AP details.
The floor plan details for an AP is only accessible for the devices that are assigned with license.
