
Backing up and Restoring Aruba Central System Data
Aruba Central (on-premises) supports backing up of system information, group configuration data, alerts, events, audit trail, sites, labels, and historical reports. You can backup Aruba Central data either manually or set a schedule for an automatic backing up of the data.
Important Points to Note
Before backing data, you must have a file server configured and ready to save the backup file.
Backups consumes large amounts of space (up to 5 terabyte). Make sure you have sufficient space for a successful backup operation.
The restore operation deletes any configuration applied before the restore. It also deletes and replaces device variables with the backed up that is being restored.
For restore operation, make sure you provide the file path that you used for backup and select the appropriate backup file version.
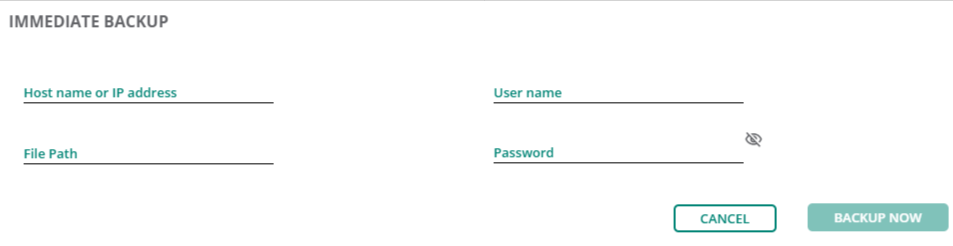
Manually Backup Data
To manually backup data:
1. In the page, under , click .
2. Click tab. The Backup and Restore page is displayed.
3. In the pane, click the menu option. The window opens.
4. In the window, configure the following parameters:
a. — Specify the host name or IP address of the server.
b. — By default, is selected.
c. — Specify the file path or folder name in the server to which you want to save the data.
d. — Specify the server SFTPSecure File Transfer Protocol. SFTP is a network protocol that allows file access, file transfer, and file management functions over a secure connection./SCPSecure Copy Protocol. SCP is a network protocol that supports file transfers between hosts on a network. username.
e. — Provide the server SFTP/SCP password.
5. Click to start backing up the data to the server. In case of successful backup, the in the backup pane shows . You can also view the status of the supported data types by clicking the arrow. The status sign against each data type turns green representing a successful backup and red representing a failed backup.
6. The following are the supported data types:
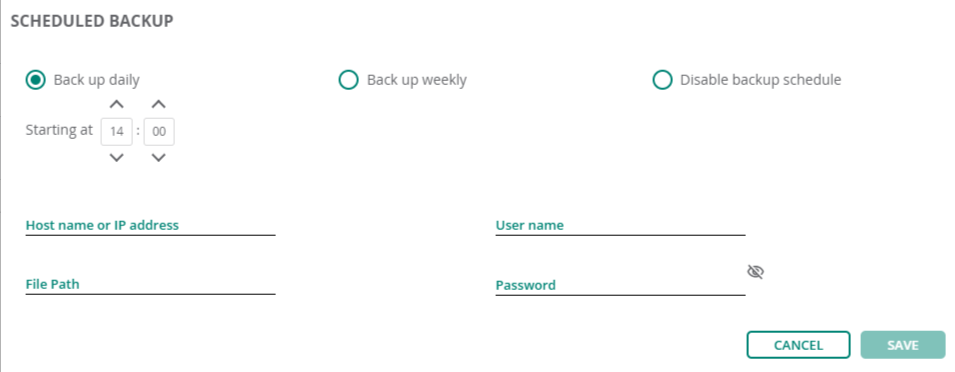
Creating a Backup Schedule
To set a schedule for regular backing up of Aruba Central data:
1. In the page, under , click .
2. Click tab. The Backup and Restore page is displayed.
3. In the pane, click the menu option. The window opens.
4. In the window, configure the following parameters:
a. Specify a backup Frequency from the following options:
— Select this option to have a backup daily. Specify the starting time at which the backup must be run.
— Select this option to have a backup weekly. Specify the backup day and starting time at which the backup must be run.
— Select this to disable the backup schedule.
b. — Specify the host name or IP address of the server.
c. — By default, is selected.
d. — Specify the file path or folder name in the server to which you want to save the data.
e. — Specify the server SFTP/SCP username.
f. — Provide the server SFTP/SCP password.
5. Click .
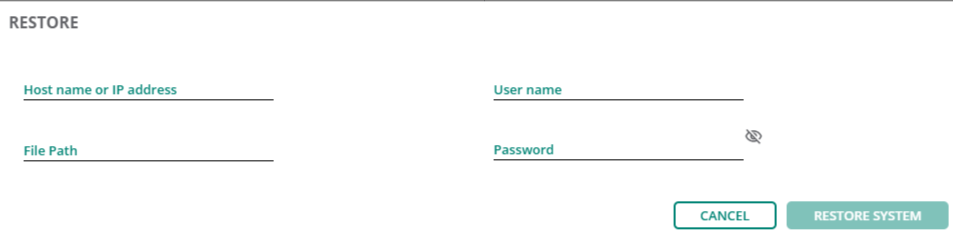
Restoring Data
To restore the backed up data:
1. In the page, under , click .
2. Click tab. The Backup and Restore page is displayed.
3. In the pane, click the menu option. The window opens.
4. In the window, configure the following parameters:
a. — Specify the host name or IP address of the server used to save the backup data.
b. — By default, is selected.
c. — Specify the file path or folder name in the server from which you want to restore the saved data.
d. — Specify the server SFTP/SCP username.
e. — Provide the server SFTP/SCP password.
5. Click .
|
|
During the restore process, most of the services will be offline for the restore and get back online when the restore is complete. You can view the progress of the restore operation by logging into Aruba Central CLI through a serial console and use the show command to navigate to Backup-Restore status. For more information, see Accessing the Aruba Central CLI and Show Commands in the Aruba Central (on-premises) user guide. |
Generating Logs
Aruba Central (on-premises) allows you to view and download logs related to the events that occurred during the backup and restore process. To generate the logs for the events, click the menu option in the pane. Once generated, the logs can be viewed from the logs table.
The table displays the following information and also allows you to download or delete logs:
— Displays the generated file name.
— Displays the date and time of the log creation.
— Displays the status of the generated logs.
— Allows you to do the following actions:
— Select the file and click the ![]() icon to download the generated file.
icon to download the generated file.
— Select the file that you want to delete and click the delete icon. In the pop-up window, click .
