
Planning and Provisioning Devices
provide the capability to plan buildings, floors, and location for device provisioning before the actual deployment. You can create a floor plan and add devices to the floor plan.
The planning and provisioning workflow includes the following procedures:
- Creating a Floor Plan
- Importing a Floor Plan
- Modifying Floor Plan Properties
- Adding Devices to the Floor Plan
Creating a Floor Plan
allow you to add, modify, and import a floor plan background image file. When importing RFRadio Frequency. RF refers to the electromagnetic wave frequencies within a range of 3 kHz to 300 GHz, including the frequencies used for communications or Radar signals. plans ensure that the devices from the device catalog are included.
To create a new floor plan, complete the following steps:
- In the app, set the filter to a .
The dashboard context for the selected site is displayed. - Under > , click . The dashboard is displayed.
- Click . The tab is displayed.
Figure 1 Floorplans Dashboard

- Click in the slide out pane on the right.
- Click . You can also add the floor plan by right-clicking on the center gray area and click . The pop-up window is displayed. The pop-up window is displayed:
- Click and locate a floor plan image file from your local file system. You can import the floor plan image file in the jpg, jpeg, gif, bmp, pdf, png, dwg, and svg format.
- Assign a floor name and a floor number in the and text boxes, respectively.
- Click .
- You can define new floor by clicking the option on the top right corner.
- The includes the following option:
- —Shows the dimensions of the floor.
- —Allows you to define floor plan boundary and planning region.
- —Allows you to import walls from the CAD file.
- —Allows you to add the access point's to the floor plan.
- Click button after you set the , , and for the floor.
- To add a planned access point, under > , select the device type from the drop-down menu.
- In the field, enter the number of devices to add to the new floor.
- Click and drag the slider bar to adjust data rates for a high density or low density environment.
- Optionally, click the link to configure the advance deployment options:
- —Select or to plan coverage by adjusting the data rate requirements (speed) or AP signal strength settings. Click to recalculate the suggested number of APs based on these settings.
- —In the field, set the anticipated number of clients that will be stationed in the floor. In the field, enter the maximum number of clients supported by each radio. Click to recalculate the suggested number of APs based on these settings.
- Click to add the planned APs to the floor.
- Click .
- To remove the planned device from the floor plan, right-click on that device and click .
Importing a Floor Plan
To import a floor plan exported from AirWave or Aruba Central, complete the following steps:
- In the app, set the filter to a .
The dashboard context for the selected site is displayed. - Under > , click . The dashboard is displayed.
- Click the menu option.
Below is an example figure of menu option:
Figure 2 Floorplans Import Option
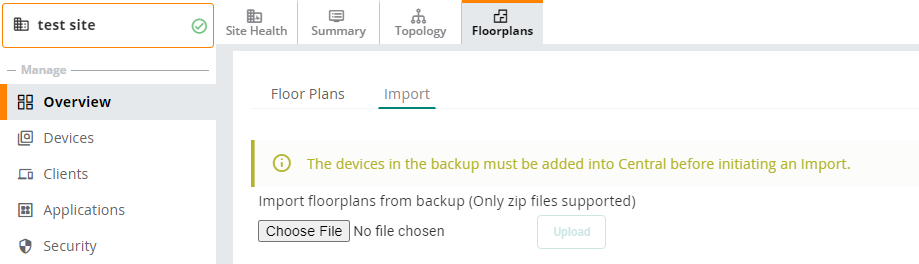
- Click and select the floor plan zip file to import.
- Click . When an import is complete, the UI displays a notification to alert the user.
Modifying Floor Plan Properties
To edit the properties of an existing floor plan, complete the following steps:
- In the app, set the filter to a .
The dashboard context for the selected site is displayed. - Under > , click . The dashboard is displayed.
- Click to modify the properties. For more information, see Customizing the Floorplans View.
- Click .
Adding Devices to the Floor Plan
You can add planned devices or devices available in Aruba Central, to a floor plan. Planned devices are used to simulate AP behaviors (heatmap coverage) on the floor plan, instead of real devices. You can match and replace planned devices with real devices that are available in Aruba Central.
To add the already deployed devices to the floor plan, complete the following steps:
- In the app, set the filter to a .
The dashboard context for the selected site is displayed. - Under > , click . The dashboard is displayed.
- Click . In case of multiple floors, select the floor from the drop-down list and click .
- Click the . A list of devices is displayed.
- Expand the group containing the APs which need to be provisioned on this floor plan. Note that by default, devices that have already been added to are hidden. To show them, clear the check box at the bottom of the list.
- Click and drag an AP to its proper location on the floor.
- To remove a device from the floor plan, right-click that device and then click
To add planned devices when creating a new floor plan, complete the following steps:
- In the app, set the filter to a .
The dashboard context for the selected site is displayed. - Under > , click . The dashboard is displayed.
- Click . In case of multiple floors, select the floor from the drop-down list and click .
- Click and select a device type (model) from the list of available devices.
- Click and drag the device to the desired location on the floor.
- To replace a planned AP with an AP that is available in Aruba Central, click from the tab.
-
To remove a planned device from the floor plan, right-click on that device and then click .
To auto-match devices, ensure that you edit the device name or MACMedia Access Control. A MAC address is a unique identifier assigned to network interfaces for communications on a network. address of the planned AP to match the name or MAC address of the AP added to Aruba Central.
