
ISO and Aruba Central (on-premises) Software Installation
The ISO installation can be performed only on Central-ready appliances. Aruba Central (on-premises)installation is a 3-stage process with multiple options in each stage:
Step 1: Install Aruba Central (On-Premises) ISO on the Server
- The installation can be done traditionally with DVD, monitor, and keyboard without the iLO interface.
- Using iLO Interface and placing the Aruba Central (On-Premises) ISO image on the PC.
- Using iLO interface and placing the Aruba Central (On-Premises) ISO image on HTTPSHypertext Transfer Protocol Secure. HTTPS is a variant of the HTTP that adds a layer of security on the data in transit through a secure socket layer or transport layer security protocol connection. server, which is reachable to the Aruba Central (On-Premises) iLO IP address.
Step 2: Install Aruba Central (On-Premises) Apps Package on the Server
The Apps package is uploaded on an SCPSecure Copy Protocol. SCP is a network protocol that supports file transfers between hosts on a network. server reachable to the Aruba Central (On-Premises) node IP address.
Step 3: Setting up a Cluster
- Assign permanent IP address and network settings to all the nodes.
- Cluster setup with all nodes.
- Proceed with Step 1 and 2 for the nodes that are part of Aruba Central (on-premises) cluster already.
Installing Aruba Central (on-premises) ISO Files on Central-Ready Airwave Appliance
There are 3 ways to install Aruba Central ISO to the Central Appliance:
- Using DVD
- Using the iLO interface with ISO image on the PC or Desktop
- Using the ISO image on an HTTPS server
Installing Aruba Central (on-premises) ISO Files Using DVD
Download the ISO image from the Aruba Support Portal and copy that ISO image into a bootable
DVD.
- Connect a monitor and a keyboard to the server.
- Insert the DVD in the DVD tray located at the front of the server and reboot the server using the command on the keyboard.
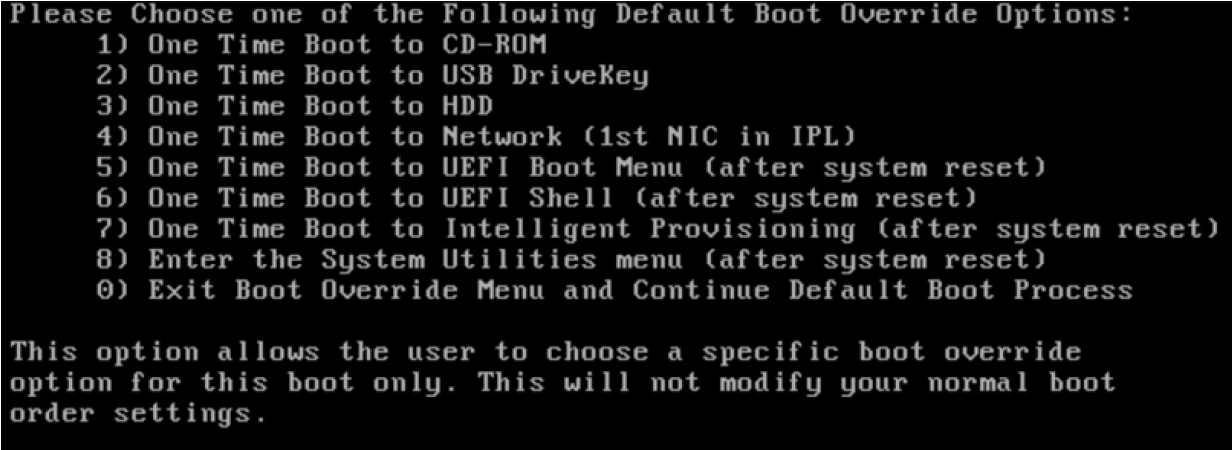
- Press to navigate to the boot options.
- Select the mode. The server will reboot again.
- Press option to boot from the CD-ROM.
- The message is prompted. Click .
- The server boots from the DVD and the ISO installation is complete.
Remove the DVD and reboot the server using the power button located at the front of server. Continue with the Central Apps package installation. For more information, see Installing Central Apps (Package Installation). For information about the boot process and iLO upgrade, see Installation Guide- Technotes.
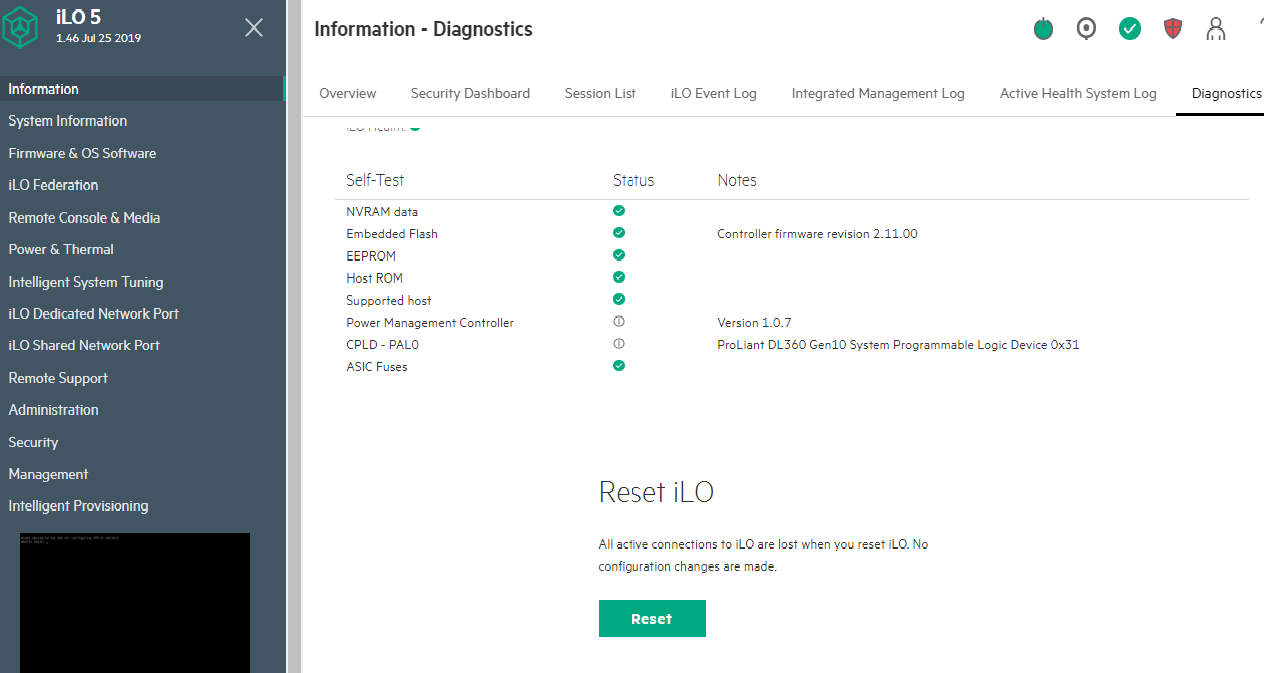
If the user is unable to login to Aruba Central (on-premises) after the ISO installation, reset the ILO through the ILO user interface. For more information, see Resetting iLO.
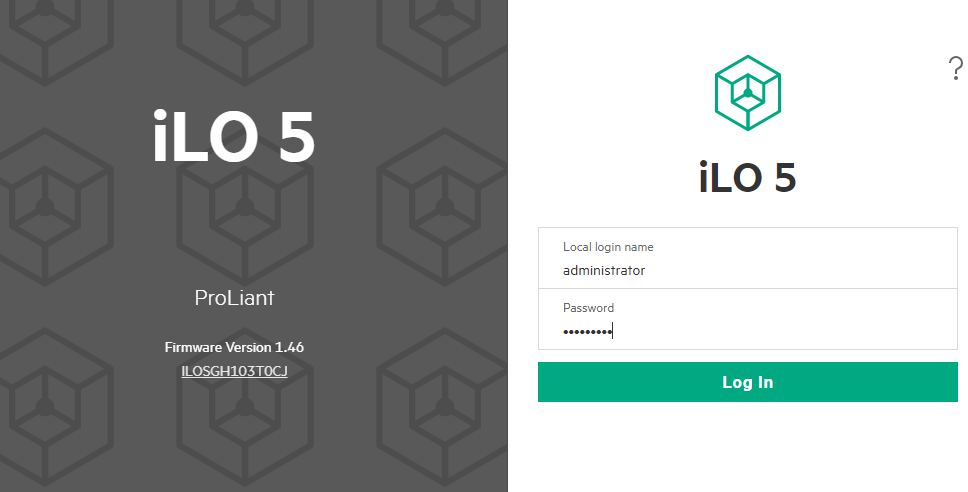
- Log into iLO user interface using the username and password.
- Go to the Information > Diagnostics tab and click Reset.
Resetting iLO
Perform the following steps to reset the iLO, if the user is unable to login to Aruba Central (on-premises) after performing the ISO installation:
Installing Aruba Central (on-premises) ISO Files Using the iLO interface with ISO image on the PC
- Obtain the iLO IP address assigned statically or by DHCPDynamic Host Configuration Protocol. A network protocol that enables a server to automatically assign an IP address to an IP-enabled device from a defined range of numbers configured for a given network. .
- Log into iLO IP address using the username and password on top of the server.
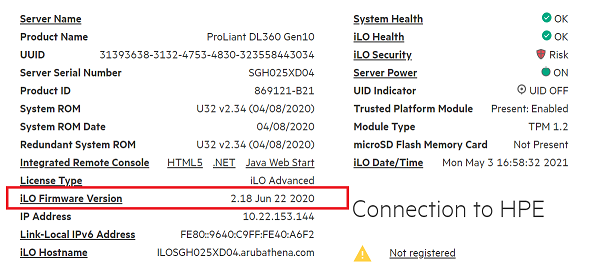
- On the iLO's Overview page, you can see that the appliance has Trusted Platform Module (TPMTrusted Platform Module. TPM is an international standard for a secure cryptoprocessor, which is a dedicated microcontroller designed to secure hardware by integrating cryptographic keys into devices.) enabled. If the option is not present or not enabled, Aruba Central software cannot be installed on the server.
- The iLO Firmware version is 2.18, which is required for Aruba Central 2.5.3 version. However, on older appliance, the iLO Firmware may be 1.40 or lower versions. Post ISO installation, the Aruba Central software will update the iLO Firmware too.
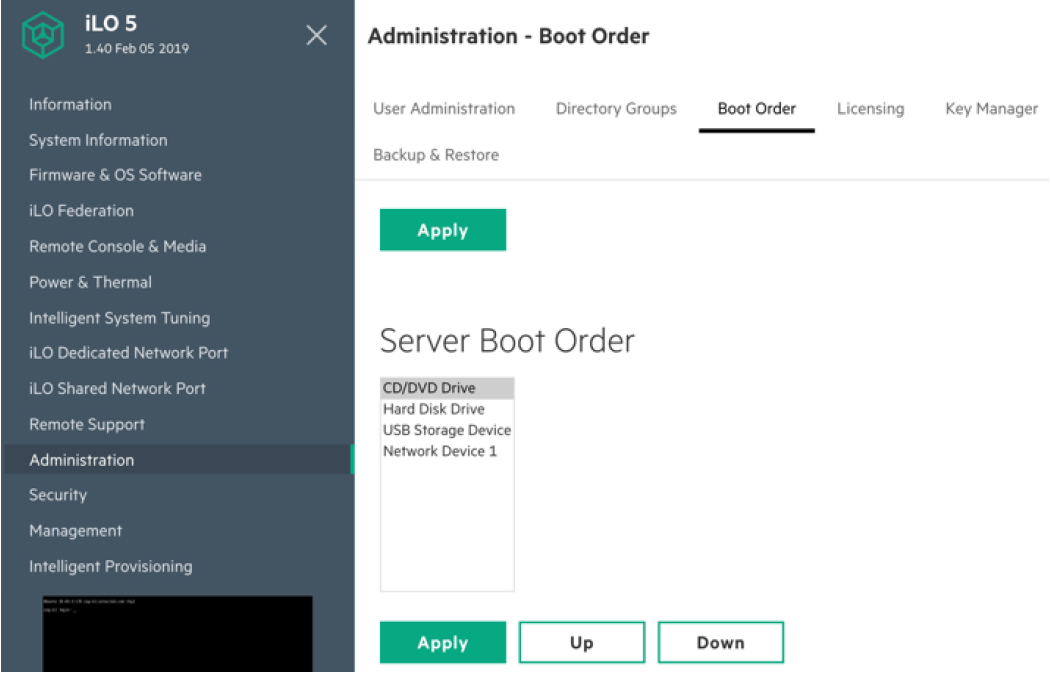
- Set the Boot process to CD/DVD Drive from > . Use the or button to move the CD/DVD Drive and click .

- Download the ISO image to the computer.
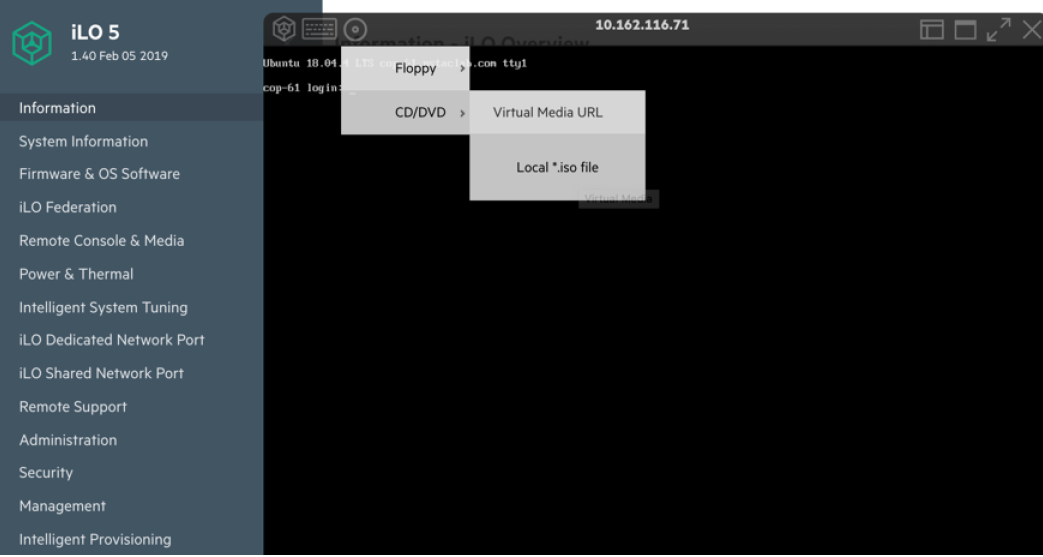
- Connect to the Java Web Console or HTML console on the iLO.
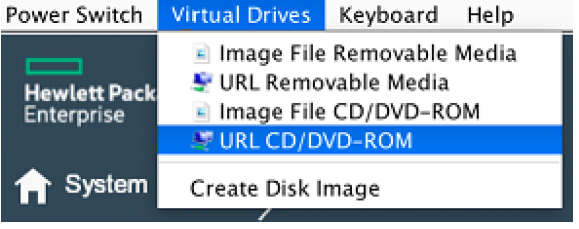
- Select the > > .
- Browse and select the ISO file from the computer and the ISO file is mounted to the server.
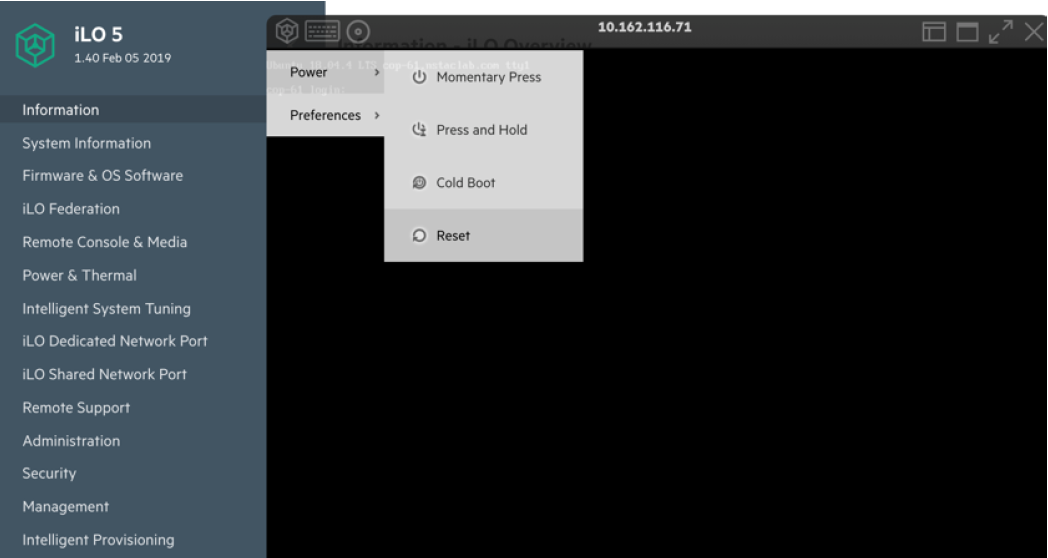
- Reboot using the > > . The server boots up with ISO image and installs the Aruba Central OS.
- Reboot post the installation and proceed to Central Apps package installation. For more information, see Installing Central Apps (Package Installation). For information about the boot process and iLO upgrade, see Aruba Central (on-premises) Installation Guide-Technotes.
Installing Aruba Central (on-premises) ISO Files Using the ISO image on an HTTPS server
- Get the iLO IP address assigned statically or by DHCP.
- Log Into iLO IP using the username and password on top of the server.
- Set the Boot process to CD/DVD Drive from > . Click the and button to move the CD/DVD Drive to top and click .
- Download the ISO image to an HTTPS server accessible from iLO IP address.
- Connect to the Java Web Console or HTML.
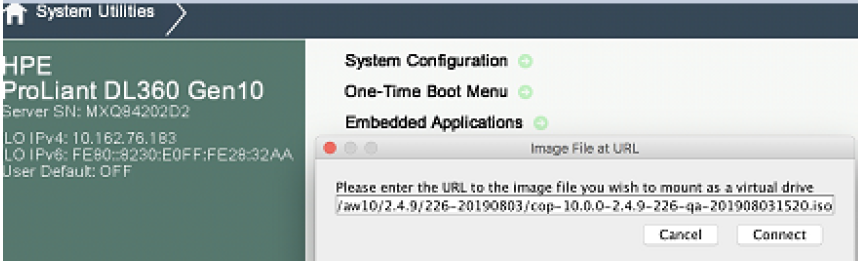
- Select > .
- Copy paste the HTTPS link for the ISO image.
- After the file is attached, reboot the server from > option. The server after the initial boot process should boot from the CD-ROM. The ISO installation takes about 25 minutes when using a bootable disk. If you are using ILO, the time depends on the network speed and VPNVirtual Private Network. VPN enables secure access to a corporate network when located remotely. It enables a computer to send and receive data across shared or public networks as if it were directly connected to the private network, while benefiting from the functionality, security, and management policies of the private network. This is done by establishing a virtual point-to-point connection through the use of dedicated connections, encryption, or a combination of the two. connection, if used remotely either from PC or using HTTPS server. For more information on the boot process, see Aruba Central (on-premises) Installation Guide-Technotes.
Installing Central Apps (Package Installation)
At the time of installing the Central apps (Package Installation), the BIOS and GRUB passwords are changed automatically.
Contact the Aruba Central support team to know more on BIOS and GRUB access.
Setting Up Temporary Network
The following information helps you perform the steps to set up the temporary network after completing the ISO installation specific to Aruba Central.
Pre-requisites
Ensure that the following actions are complete before setting up the temporary network:
- The Aruba Central ISO installation is completed on Central-ready appliance.
- The HPE ProLiant server is manually rebooted.
Perform the following steps to set up a temporary network:
- Login to HPE ProLiant server using the following default credentials:
- Username:
- Password:

You can derive the serial number from the label of the Central appliance. For example, e.g. SGH****.
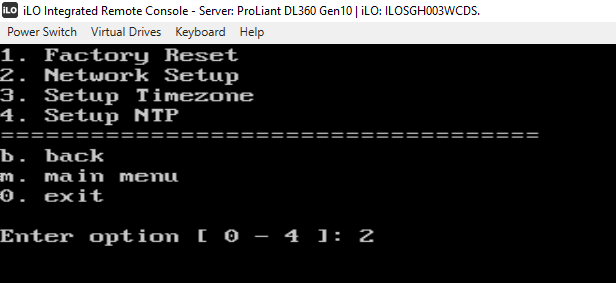
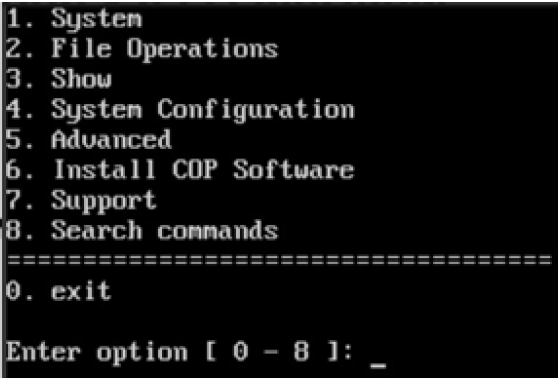
The Aruba Central CLI menu is displayed.
-
Enter to select the option and go to the next menu item.

-
Enter to select the option and go to the next menu item.
-
Enter to select the Settings option and go to the next menu item.
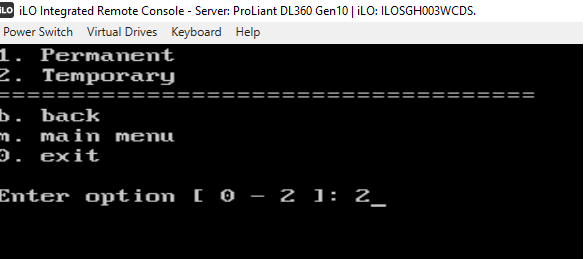
- When prompted, enter the following network settings to set up the temporary network:
- Hostname
- Server IP address
- SubnetSubnet is the logical division of an IP network. mask
- Gateway IP address
- DNSDomain Name System. A DNS server functions as a phone book for the intranet and Internet users. It converts human-readable computer host names into IP addresses and IP addresses into host names. It stores several records for a domain name such as an address 'A' record, name server (NS), and mail exchanger (MX) records. The Address 'A' record is the most important record that is stored in a DNS server, because it provides the required IP address for a network peripheral or element. server IP address
- Secondary DNS server address (optional)
Enter to go back to the main menu.
Uploading Aruba Central Apps Tarball
Perform the following steps to upload the Aruba Central apps tarball:
-
In the Aruba Central CLI, enter to upload the tarball file and go to the next menu item.
- Enter the details of apps tarball that are required to be copied from remote server via SCP.
The SCP progress related to apps tarball is displayed on the console.
- Enter followed by to confirm that the apps tarball has been uploaded.
Installing COP Software
-
In the Aruba Central CLI, enter to select the option.

A list of available tarball file candidates is displayed.
- Enter the number corresponding to the tarball file that is displayed in the list.
- Wait for the software installation to completion.
- Once the ISO and Aruba Central (on-premises) software installations are complete, you can set up the network cluster. For more information, see Installing and Setting Up Aruba Central (on-premises).
