
Provisioning Pre-Configured AOS-CX Switches
Unlike factory default switches, locally managed switches and the switches with custom configuration require one touch provisioning. On AOS-CX switches, Aruba Central is enabled, by default, as their management platform, and therefore the switches connect to Aruba Central automatically.
To onboard a locally-managed or a pre-configured AOS-CX switch to Aruba Central, follow one of the following options:
- Connect the AOS-CX switch directly to Aruba Central. Aruba recommends that you use this option if you want to preserve the current configuration running on the switch. For more information on this procedure, see the workflows described in this topic.
To manually connect the switch to Aruba Central (on-premises), you must configure the Aruba Central (on-premises) URLUniform Resource Locator. URL is a global address used for locating web resources on the Internet. on the switch. Execute the following commands in the switch CLI:
config terminal
aruba-central <Aruba Central (on-premises) URL> vrf mgmt
exitAruba does not recommend to manually provision the URL in a cloud deployment.
- Reset the switch configuration to factory default and use ZTPZero Touch Provisioning. ZTP is a device provisioning mechanism that allows automatic and quick provisioning of devices with a minimal or at times no manual intervention. to provision the switch. For information on provisioning factory default switches, see Provisioning Factory Default AOS-CX Switches.
Aruba Central supports provisioning AOS-CX switches using one of the following methods:
- Pre-provisioning—In this workflow, a switch is added to the device inventory and assigned a group in Aruba Central before it connects to Aruba Central.
- See Workflow 1—Pre-Provisioning an AOS-CX Switch.
- Onboarding connected switches—In this workflow, Aruba Central onboards the switch that attempts to connect and then assigns a group.
- See Workflow 2—Provisioning an AOS-CX Switch On-Demand.
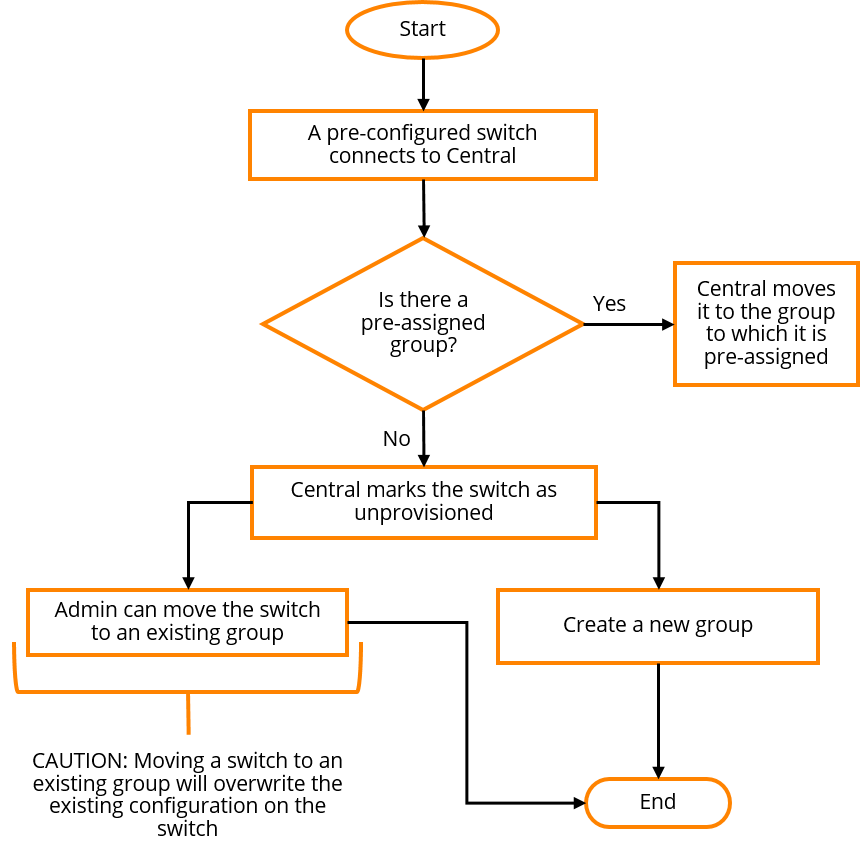
The following figure illustrates provisioning procedure for a pre-configured switch.
Figure 1 Provisioning Workflow for Pre-Configured Switches
Workflow 1—Pre-Provisioning an AOS-CX Switch
The pre-provisioning workflow includes the following steps:
Step 1: Onboard the AOS-CX Switch to Aruba Central
To onboard AOS-CX switches to the device inventory in Aruba Central, complete the following steps:
Step 2: Assign the AOS-CX Switch to a Group
AOS-CX switches can be provisioned in a template group only. If you want to preserve the existing configuration on the switch, Aruba recommends that you create a new group for the switch.
For more information on creating a group, see Creating a Group.
To assign a device to a group from the page:
- In the page, under , click .
The Device Inventory page is displayed
- Select the device that you want to assign to a group.
- Click . The window is displayed.
- Select the group to which you want to assign.
- Click .
To assign a device to a group from the app:
- In the app, set the filter to .
The dashboard context for the group is displayed.
- Under , click > .
The Groups page is displayed.
- From the devices table on the right, select the device that you want to assign to a new group.
- Drag and drop the device to the group to which you want to assign the device.
Step 3: Provision the AOS-CX Switch to a Group
When the AOS-CX switch connects to Aruba Central, Aruba Central automatically assigns it to the pre-assigned template group.
You can import the existing switch configuration to a new configuration template and apply this template to other devices in the group. To create a configuration template using the existing configuration on the switch:
- In the app, set the filter to a template group.
The dashboard context for the group is displayed.
- Under , click > .
- Click the Config icon.
The tabs to configure switches using templates is displayed.
- Click the tab. The Templates page is displayed.
- Click to add a new template. The window is displayed.
- In the tab, enter a name for the template in the field.
- In the drop-down, select .
- Select the switch model and software version. You can specify any of the following combinations:
- for both and —To apply the template to all switch models and all supported switch software versions.
- for and a software version for —To apply the template to all switch models running the selected software version.
- for and a switch model for —To apply the template to a switch model and all software versions supported by the selected switch model.
- A switch model and a software version—To apply the template to a specific switch model and the software version. The template created for a switch model and a software version takes precedence over the template that is created for all platforms and versions.
- Select the manufacturing part number of the switch in the drop-down.
The drop-down is displayed only if you select a switch model in the drop-down.
If you select a specific switch model and part number, you can apply the template to a standalone switch and not to a stack.
If you select in the drop-down, or if you select a switch model and in the drop-down, you can apply a template to both a standalone switch and stack.
- Click . The tab is displayed.
- Build a new template by adding the output of the show running-config from the switch CLI in the text box. Ensure that the template text adheres to the guidelines listed in Using Configuration Templates for AOS-CX Switch Management.
You must manually create the template for the AOS-CX switch in a group, along with the password in plaintext format. You can use the output of the show running-config command to create the template. You can also add variables to use the same template for onboarding multiple AOS-CX switches. For more information on variables, see Managing Switch Variable Files.
All switch templates must include a password command to set a password for the device. The template cannot be saved without adding a password command. If the configuration that is pushed from Aruba Central to the device does not contain a password command, the configuration push is aborted for the device and a log is added to the audit trail. For example, if you add the password command in a condition block and the condition evaluates to false, the configuration that is pushed will not contain the password command. For more information, see Managing Password in Configuration Templates.
For AOS-CX switches, you must configure the password only in plaintext. Also, the format of password must be user admin group administrators password plaintext <string>.
For AOS-CX switches, the password configured in the template must match the password configured on the switch. Aruba Central cannot override the password that is configured on the switch.
- Click . After you apply the configuration template, switches reboot and reconnect to Aruba Central with the new configuration.
Step 4: Verify the Configuration Status
To verify the configuration status:
- In the app, set the filter to a template group.
The dashboard context for the group is displayed.
- Under , click > .
- Click the icon.
The tabs to configure switches using templates is displayed.
- To verify the configuration status for the template group, click . The dashboard displays the number of devices with template and configuration synchronization errors.
- To view configuration errors for a specific device, select a switch from the filter bar. The dashboard displays the number of template and configuration synchronization errors for the device.
- To view template errors, click .
- To view configuration synchronization errors, click under .
- To compare running configuration and pending changes, click under .
Workflow 2—Provisioning an AOS-CX Switch On-Demand
To dynamically provision switches on-demand, complete the following steps:
Step 1: Add the AOS-CX Switch to Aruba Central
Add the switch to the Aruba Central device inventory. For more information, see Onboarding Devices.
Step 2 Assign a Subscription to the AOS-CX Switch
To allow Aruba Central to manage the switch, ensure that a valid subscription is assigned to the switch.
Step 3: Provision the AOS-CX Switch to a Group
If the switch has a valid subscription assigned, Aruba Central marks the switch as . To preserve the switch configuration, move it to a new template group.
- Create a template group.
- In the app, set the filter to .
The dashboard context for the group is displayed.
- Under , click > .
The Groups page is displayed.
- Select the AOS-CX switch.
- Drag and drop the switch to the new template group that you just created. Aruba Central adds the switch to the new template group.
- To build a new configuration template:
- In the app, set the filter to a template group.
The dashboard context for the group is displayed.
- Under , click > .
- Click the icon.
The tabs to configure switches using templates is displayed.
- Click the tab. The Templates page is displayed.
- Click to add a new template. The window is displayed.
- In the tab, enter a name for the template in the field.
- In the drop-down, select .
- Select the switch model and the software version to which you want to apply the new template. You can specify any of the following combinations:
- for both and —To apply the template to all switch models and all supported switch software versions.
- for and a software version for —To apply the template to all switch models running the selected software version.
- for and a switch model for —To apply the template to a switch model and all software versions supported by the selected switch model.
- A switch model and a software version—To apply the template to a specific switch model and the software version. The template created for a switch model and a software version takes precedence over the template that is created for all platforms and versions.
- Select the manufacturing part number of the switch in the drop-down.
The drop-down is displayed only if you select a switch model in the drop-down.
If you select a specific switch model and part number, you can apply the template to a standalone switch and not to a stack.
If you select in the drop-down, or if you select a switch model and in the drop-down, you can apply a template to both a standalone switch and stack.
- Click . The tab is displayed.
- Build a new template by adding the output of the show running-config from the switch CLI in the text box. Ensure that the template text adheres to the guidelines listed in the Using Configuration Templates for AOS-CX Switch Management.
You must manually create the template for the AOS-CX switch in a group, along with the password in plaintext format. You can use the output of the show running-config command to create the template. You can also add variables to use the same template for onboarding multiple AOS-CX switches. For more information on variables, see Managing Switch Variable Files.
All switch templates must include a password command to set a password for the device. The template cannot be saved without adding a password command. If the configuration that is pushed from Aruba Central to the device does not contain a password command, the configuration push is aborted for the device and a log is added to the audit trail. For example, if you add the password command in a condition block and the condition evaluates to false, the configuration that is pushed will not contain the password command. For more information, see Managing Password in Configuration Templates.
For AOS-CX switches, you must configure the password only in plaintext. Also, the format of password must be user admin group administrators password plaintext <string>.
For AOS-CX switches, the password configured in the template must match the password configured on the switch. Aruba Central cannot override the password that is configured on the switch.
- Click . After you apply the configuration template, switches reboot and reconnect to Aruba Central with the new configuration.
- In the app, set the filter to a template group.
Step 4: Verify the Configuration Status
To verify the configuration status:
- In the app, set the filter to a template group.
The dashboard context for the group is displayed.
- Under , click > .
- Click the icon.
The tabs to configure switches using templates is displayed.
- To verify the configuration status for the template group, click . The dashboard displays the number of devices with template and configuration synchronization errors.
- To view configuration errors for a specific device, select a switch from the filter bar. The dashboard displays the number of template and configuration synchronization errors for the device.
- To view template errors, click .
- To view configuration synchronization errors, click under .
- To compare running configuration and pending changes, click under .
