
Provisioning Factory Default AOS-Switches
Switches that run default configuration either after shipped from a factory or a factory reset are referred to as factory default switches. This topic describes the steps for provisioning factory default switches in Aruba Central.
Step 1: Onboard the AOS-Switch to Aruba Central
Log in to Aruba Central and onboard the switch.
Step 2: Assign the AOS-Switch to a Group
Before assigning a group, determine if the switch must be provisioned in a UI or template group. By default, Aruba Central assigns the factory default switches to the default group. You can create a new group and assign switch to the new group.
For step-by-step instructions on creating a group, see Managing Groups.
To assign a device to a group from the page:
- In the page, under , click .
The Device Inventory page is displayed.
- Select the device that you want to assign to a group.
- Click .
The window is displayed.
- Select the group to which you want to assign.
- Click .
To assign a device to a group from the app:
- In the app, set the filter to .
The Global dashboard is displayed.
- Under , click > .
The Groups page is displayed.
- From the devices table on the right, select the device that you want to assign to a new group.
- Drag and drop the device to the group to which you want to assign the device.
Step 3: Connect the AOS-Switch to Aruba Central
Switches with factory default configuration have very basic configuration for all ports in VLANVirtual Local Area Network. In computer networking, a single Layer 2 network may be partitioned to create multiple distinct broadcast domains, which are mutually isolated so that packets can only pass between them through one or more routers; such a domain is referred to as a Virtual Local Area Network, Virtual LAN, or VLAN.-1 that is required for obtaining an IP address and automatic provisioning (ZTPZero Touch Provisioning. ZTP is a device provisioning mechanism that allows automatic and quick provisioning of devices with a minimal or at times no manual intervention.). For ZTP, switches must have a valid IP address, DNSDomain Name System. A DNS server functions as a phone book for the intranet and Internet users. It converts human-readable computer host names into IP addresses and IP addresses into host names. It stores several records for a domain name such as an address 'A' record, name server (NS), and mail exchanger (MX) records. The Address 'A' record is the most important record that is stored in a DNS server, because it provides the required IP address for a network peripheral or element., and NTPNetwork Time Protocol. NTP is a protocol for synchronizing the clocks of computers over a network. configuration.
When a factory default switch is powered on and connected to the Internet, it establishes connection with Aruba Activate and downloads the provisioning parameters. If the switch is already added and assigned a subscription, it connects to Aruba Central.
Step 4: Provision the AOS-Switch to a Group
When the switch connects to Central, if it is already added to the device inventory and is assigned a subscription in Aruba Central, Aruba Central assigns it to a pre-assigned group. If there is no pre-assigned group, Aruba Central moves the device to group. Based on your configuration requirements, you create a UI group or template group and assign the switch.
The following figure illustrates the provisioning step required for each group type.
Figure 1 Switch Provisioning Steps Per Group Type
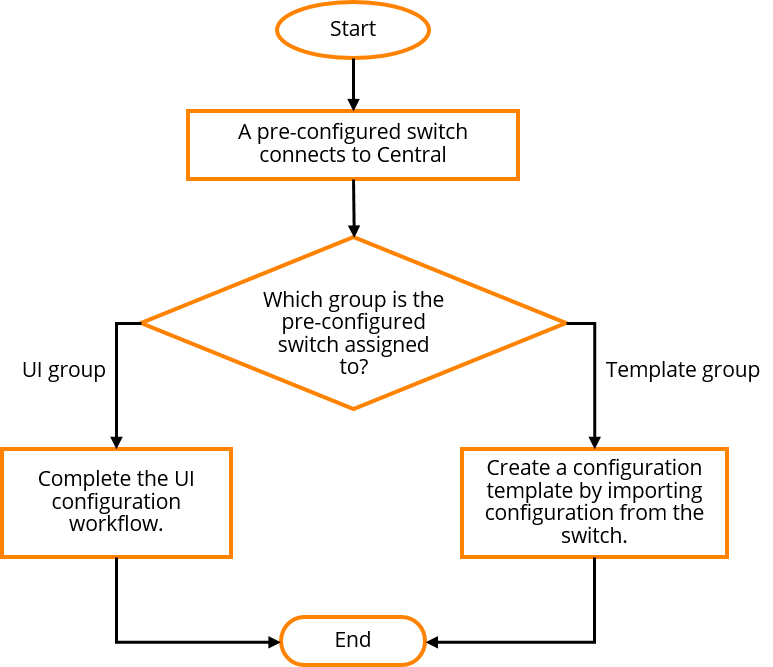
If the switch is assigned to a new UI group, Aruba Central uses the current configuration of switch as base configuration and applies it to the other switches that join this group later. You can also modify the configuration of switches in a group using the UI menu options under app > > > . For more information, see Configuring AOS-Switches in UI Groups.
Provisioning AOS-Switches in Template Groups
If you have assigned the switch to a template group, create a new configuration template. To create a configuration template:
- In the app, set the filter to a template group.
The dashboard context for the group is displayed.
- Under , click > .
- Click the Config icon.
The tabs to configure switches using templates is displayed.
- Click the tab. The Templates page is displayed.
- Click to add a new template. The window is displayed.
- In the tab, enter a name for the template in the field.
- In the drop-down, select .
- Select the switch model and software version. You can specify any of the following combinations:
- for both and —To apply the template to all switch models and all supported switch software versions.
- for and a software version for —To apply the template to all switch models running the selected software version.
- for and a switch model for —To apply the template to a switch model and all software versions supported by the selected switch model.
- A switch model and a software version—To apply the template to a specific switch model and the software version. The template created for a switch model and a software version takes precedence over the template that is created for all platforms and versions.
- Select the manufacturing part number of the switch in the drop-down.
The drop-down is displayed only if you select a switch model in the drop-down.
If you select a specific switch model and part number, you can apply the template to a standalone switch and not to a stack.
If you select in the drop-down, or if you select a switch model and in the drop-down, you can apply a template to both a standalone switch and stack.
- Click . The tab is displayed.
- Build a new template or import configuration information from a switch that is already provisioned in the template group.
- To build a new template, add the switch command information in the text box. Ensure that the template text adheres to the guidelines listed in Using Configuration Templates for AOS-Switch Management.
- To import configuration text from a switch that is already provisioned in the template group:
- Click .
- From the search box, select the switch from which you want to import the configuration. The imported configuration is displayed in the text box.
Importing configuration from an existing device in the template group allows you to quickly create a basic template. However, before applying the template to other switches in the group, ensure that the template text is variabilized as per your deployment requirements. For more information, see Managing Variable Files.
All switch templates must include a password command to set a password for the device. The switch template cannot be saved without adding a password command. If the configuration that is pushed from Aruba Central to the device does not contain a password command, the configuration push is aborted for the device and a log is added to the audit trail. For example, if you add the password command in a condition block and the condition evaluates to false, the configuration that is pushed will not contain the password command. For more information, see Managing Password in Configuration Templates .
For more information about using password commands, see the Configuring Username and Password Security chapter in the ArubaOS-Switch Access Security Guide.
- To view the variables present in the imported configuration template, click . The Variables in Template column is displayed.
For more information on variables, see Managing Variable Files.
- To download the variables as a CSVComma-Separated Values. A file format that stores tabular data in the plain text format separated by commas. or plain text file, click the download icon and select one of the following options:
- Click . After you apply the configuration template, switches reboot and reconnect to Aruba Central with the new configuration.
Step 5: Verify the Configuration Status
To verify the configuration status:
- In the app, set the filter to a template group.
The dashboard context for the group is displayed.
- Under , click > .
- Click the icon.
The tabs to configure switches using templates is displayed.
- To verify the configuration status for the template group, click . The dashboard displays the number of devices with template and configuration synchronization errors.
- To view configuration errors for a specific device, select a switch from the filter bar. The dashboard displays the number of template and configuration synchronization errors for the device.
- To view template errors, click .
- To view configuration synchronization errors, click under .
- To compare running configuration and pending changes, click under .
