
Managing Certificates
Certificates provide a secure way of authenticating devices and eliminate the need for less secure password-based authentication. In certificate-based authentication, digital certificatesA digital certificate is an electronic document that uses a digital signature to bind a public key with an identity—information such as the name of a person or an organization, address, and so forth. are used to identify a user or device before granting access to a network or application.
Digital certificates use PKIPublic Key Infrastructure. PKI is a security technology based on digital certificates and the assurances provided by strong cryptography. See also certificate authority, digital certificate, public key, private key. that requires a private-public keyThe part of a public-private key pair that is made public. The public key encrypts a message and the message is decrypted with the private key of the recipient. pair. A digital certificate is associated with a private keyThe part of a public-private key pair that is always kept private. The private key encrypts the signature of a message to authenticate the sender. The private key also decrypts a message that was encrypted with the public key of the sender., known only to the certificate owner and a public key. A certificate encrypted with a private key is decrypted with its public key. For example, party A encrypts its certificate with its private key and sends it to party B. Party B decrypts the certificate with the public key of party A. Server certificates and the digital certificates issued by a CACertificate Authority or Certification Authority. Entity in a public key infrastructure system that issues certificates to clients. A certificate signing request received by the CA is converted into a certificate when the CA adds a signature generated with a private key. See digital certificate. validate the identities of servers and clients. For example, when a client connects to a server for the first time, or the first time since its previous certificate has expired or been revoked, the server requests that the client transmit its authentication certificate and verifies it. Clients can also request and verify the authentication certificate of the server.
Device Certificates
Aruba devices use digital certificates for authenticating a client's access to user-centric network services. Most devices such as controllers and Instant APs include the certificate of the CA who issued the server certificate for captive portalA captive portal is a web page that allows the users to authenticate and sign in before connecting to a public-access network. Captive portals are typically used by business centers, airports, hotel lobbies, coffee shops, and other venues that offer free Wi-Fi hotspots for the guest users. server authentication. However, Aruba recommends that you replace the default certificate with a custom certificate issued for your site or domain by a trusted CA. Certificates can be stored locally on the devices and used for validating device or user identity during authentication.
Viewing the Certificate Store Parameters
To view the certificate store parameters, complete the following steps:
- In the app, set the filter to .
-
Under > , click .
The page is displayed.
- If required, expand the accordion to view the table.
Table 1: Certificate Store Parameters
|
Parameter |
Description |
|---|---|
|
|
Name of the certificate. |
|
|
Status of the certificate. |
|
|
Expiry date of the certificate. |
|
|
Type of certificate. |
|
|
The Message Digest 5 algorithm is a widely used hash function producing a 128-bit hash value from the data input. |
|
|
The Secure Hash Algorithm 1 is a cryptographic hash function which takes an input and produces a 160-bit (20-byte) hash value. |
|
In the table, click on the |
|
Uploading Device Certificates
To upload certificates, complete the following steps:
-
In the app, set the filter to .
-
Under > , click .
The page is displayed.
-
If required, expand the accordion to view the table.
-
Click the
 plus icon to add the certificate to the .
 -
In the dialog box, do the following:
Parameter
Description
Specify the name of the Certificate.
From the drop-down list, select of certificate type. You can select any one of the following certificates:
- —Digital certificates issued by the CA.
- —Server certificates required for communication between devices and authentication servers.
- —Certificate Revocation List that contains the serial numbers of certificates that have been revoked. This certificate is required for performing a certificate revocation check.
- —OCSPOnline Certificate Status Protocol. OCSP is used for determining the current status of a digital certificate without requiring a CRL. responder certificates.
- —OCSP Response Signing Certificate.
The OCSP certificates are required for OCSP server authentication.
From the drop-down list, select a certificate format. You can select any one of the following certificates:
- PEM—Privacy Enhanced Mail is a Base64 encoded DER certificate.
- DER—Distinguished Encoding Rules files are digital certificates in binary format. Both digital certificates and private keys can be encoded in DER format.
- PKCS12—Public-Key Cryptography Standards 12 is an archive file format for storing many cryptography objects as a single file.
For more information, see Viewing the Certificate Store Parameters.
In the text box, enter a passphrase.
In the text box, retype the passphrase for confirmation.
The and text boxes are displayed only when you select from the drop-down list.
In the field, click and browse to the location where the certificates are stored and select the certificate files.
Click . The certificate is added to the .
Deleting Device Certificates
To delete certificates, complete the following steps:
- In the app, set the filter to .
-
Under > , click .
The page is displayed.
-
In the table, select the certificate that you want to delete and click the delete icon.
The pop-up window is displayed.
- Click in the pop-up window to delete the certificate.
Appliance Certificates
By default, Aruba Central includes a self-signed certificate that is available on the > page.
Viewing the Certificate Store Parameters
To view the certificate store parameters, complete the following steps:
- In the app, set the filter to .
-
Under > , click .
The page is displayed.
- Expand the to view the table.
For viewing the certificate store parameters, refer to Certificate Store Parameters
Uploading Appliance Certificates
To view the certificate store parameters, complete the following steps:
-
In the app, set the filter to .
-
Under > , click .
The page is displayed.
-
Expand the to view the table.
-
Click the
plus icon to add the certificate to the . -
In the dialog box, do the following:
|
Parameter |
Description |
|---|---|
|
|
Specify the name of the Certificate. |
|
|
From the drop-down list, select of certificate type. You can select any one of the following certificates:
|
|
|
From the drop-down list, select a certificate format. You can select any one of the following certificates:
|
|
|
In the text box, enter a passphrase. |
|
|
In the text box, retype the passphrase for confirmation. The and text boxes are displayed only when you select S from the drop-down list. |
|
|
In the field, click and browse to the location where the certificates are stored and select the certificate files. |
|
Click . The certificate is added to the . |
|
Deleting Appliance Certificates
To delete certificates, complete the following steps:
- In the app, set the filter to .
-
Under > , click .
The page is displayed.
- In the table, select the certificate that you want to delete and click the delete icon.
The pop-up window is displayed.
- Click in the pop-up window to delete the certificate.
Certificate Signing Request
Aruba Central also supports Certificate Signing Request (CSRCertificate Signing Request. In PKI systems, a CSR is a message sent from an applicant to a CA to apply for a digital identity certificate.) generation.
To generate CSR for certificates, complete the following steps:
- In the app, set the filter to .
- Under > , click .
The page is displayed.
- Under , click .
The is displayed.
- Enter the following details:
Parameter
Description
Unique name
Name of your organization.
Department name of your organization.
Name of the city of your organization.
Name of the state of your organization.
Country code of your organization. See List of accepted country codes.
Contact email address.
- Click . A PEM file with both the public and private key is generated and downloaded automatically.
- Remove the private key for root CA certification. After the root CA signs the certificate, add the private key, and upload the PEM file again.
Supported Certificate Formats
The following section describes the different certificate formats supported in Aruba Central (on-premises).
PEM Format
The PEM format is the most common format that Certificate Authorities issue certificates in. PEM certificates usually have extentions such as .pem, .crt, .cer, and .key. They are Base64 encoded ASCIIAmerican Standard Code for Information Interchange. An ASCII code is a numerical representation of a character or an action. files and contain "-----BEGIN CERTIFICATE-----" and "-----END CERTIFICATE-----" statements. Server certificates, intermediate certificates, and private keys can all be put into the PEM format.
Apache and other similar servers use PEM format certificates. Several PEM certificates, and even the private key, can be included in one file, one below the other, but most platforms, such as Apache, expect the certificates and private key to be in separate files. For more information, see Sample PEM file.
DER Format
The DER format is a binary form of a certificate instead of the ASCII PEM format. It sometimes has a file extension of .der but it often has a file extension of .cer so the only way to tell the difference between a DER .cer file and a PEM .cer file is to open it in a text editor and look for the BEGIN/END statements. All types of certificates and private keys can be encoded in DER format. DER is typically used with Java platforms. The SSLSecure Sockets Layer. SSL is a computer networking protocol for securing connections between network application clients and servers over the Internet. Converter can only convert certificates to DER format. If you need to convert a private key to DER, use the OpenSSL commands on this page.
PKCS#12 or PFX Format
The PKCS#12 or PFX format is a binary format for storing the server certificate, any intermediate certificates, and the private key in one encryptable file. PFX files usually have extensions such as .pfx and .p12, .PFX files are typically used on Windows machines to import and export certificates and private keys.
When converting a PFX file to PEM format, OpenSSL will put all the certificates and the private key into a single file. You will need to open the file in a text editor and copy each certificate and private key (including the BEGIN/END statments) to its own individual text file and save them as certificate.cer, CACert.cer, and privateKey.key respectively.
Wildcard Certificates
A wildcard certificate is a digital certificate that is applied to a domain and all its subdomains. SSL certificates use the wildcards to extend SSL encryptions to subdomains. All the wildcard certificates have a * in their common names. For example, a certificate that has *.arubathena.com in its common name, is a wildcard certificate.
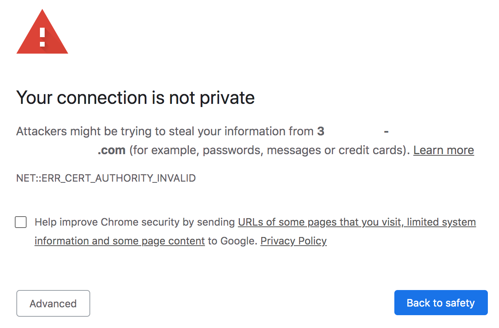
Once Aruba Central (on-premises) is installed by the user, a self-signed certificate gets generated automatically and this certificate is not provided by any authorized CA providers. So, when you access the Aruba Central (on-premises) server using an FQDN, the browser displays a warning, , because this certificate is not trusted by the browser.
Figure 1 Connection Status
The following section describes how to check the status of the certificates, request for a certificate, and upload the certificate.
Checking the Status of the Certificate
To check the status or validity of a certificate, perform the following steps:
- Login to the Aruba Central (on-premises) server.
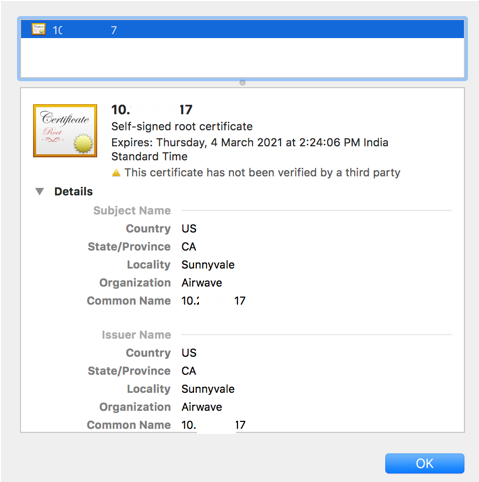
- Click the view site information icon next to the URL in the browser.
- Click .
The certificate information is displayed. Here, you can check if the certificate is self-signed certificate and more details like Country, Issues Name, etc.
Figure 2 Certificate Details
Requesting for Wildcard certificate
If the certificate is not secure or invalid, ensure to request for a wildcard certificate or a certificate for the FQDN of the Aruba Central (on-premises) server from an authorized certificate provider to resolve the certificate error.
Uploading the Wildcard Certificate
Once you get the certificates required, upload the certificate in the Aruba Central (on-premises) system. Perform the following steps to add the wildcard certificate:
- In the app, set the filter to .
- Under , click .
The page is displayed
- Expand the to view the .
- Click the plus icon to add the certificate to the .
- In the dialog box, enter the name.
- Select from the drop-down list.
- Select from the drop-down list.
- Enter the and .
- In the field, click and browse to the location where the certificates are stored and select the wildcard certificate.
The PEM file contains the certificates and the private key. The private key must be in the PEM format and appended after all the certificates. For more information, see Sample PEM format.
- Click .
The new valid certificate is successfully added.
- Once the valid certificate is uploaded, ensure to check the status of the certificate. For the steps, see Checking the Status of the Certificate
The wildcard certificate information is displayed.
This wildcard certificate can be applied to any server where the FQDN has one hostname followed by .domainname.com. The same wildcard certificate cannot be used for servers which have other formats like *.aw.domainname.com.
Following is a sample of the certificate file in PEM format:
