
Getting Started with AOS-CX Deployments
Before you get started with your onboarding and provisioning operations, browse through the list of Supported AOS-CX Switch Platforms in Aruba Central (on-premises).
Provisioning Workflow
The following sections list the steps required for provisioning AOS-CX switches in Aruba Central (on-premises).
Provisioning a Factory Default AOS-CX Switch
Like most Aruba devices, AOS-Switches support ZTPZero Touch Provisioning. ZTP is a device provisioning mechanism that allows automatic and quick provisioning of devices with a minimal or at times no manual intervention.. Switches with factory default configuration have very basic configuration for all ports in VLAN-1. You must manually add either the serial number, MACMedia Access Control. A MAC address is a unique identifier assigned to network interfaces for communications on a network. address, or part number of the new factory default switch in Aruba Central (on-premises). When the switch identifies Aruba Central (on-premises) as its management entity, it connects to Aruba Central (on-premises).
To manage AOS-CX switches from Aruba Central (on-premises), you must onboard the switches to the device inventory and assign a valid subscription.
For step-by-step instructions, see Provisioning Factory Default AOS-CX Switches.
Provisioning a Pre-configured or Locally-Managed AOS-CX Switch
Pre-configured switches have customized configuration; for example, an additional VLANVirtual Local Area Network. In computer networking, a single Layer 2 network may be partitioned to create multiple distinct broadcast domains, which are mutually isolated so that packets can only pass between them through one or more routers; such a domain is referred to as a Virtual Local Area Network, Virtual LAN, or VLAN. or static IP address configured on the default.
Aruba Central (on-premises) management service is enabled by default on AOS-CX switches. When the switch is powered on, it identifies Aruba Central (on-premises) as its management entity and connects to Aruba Central (on-premises).
To manage AOS-CX switches from Aruba Central (on-premises), you must onboard the switches to the device inventory and assign a valid subscription.
For step-by-step instructions, see Provisioning Pre-Configured AOS-CX Switches.
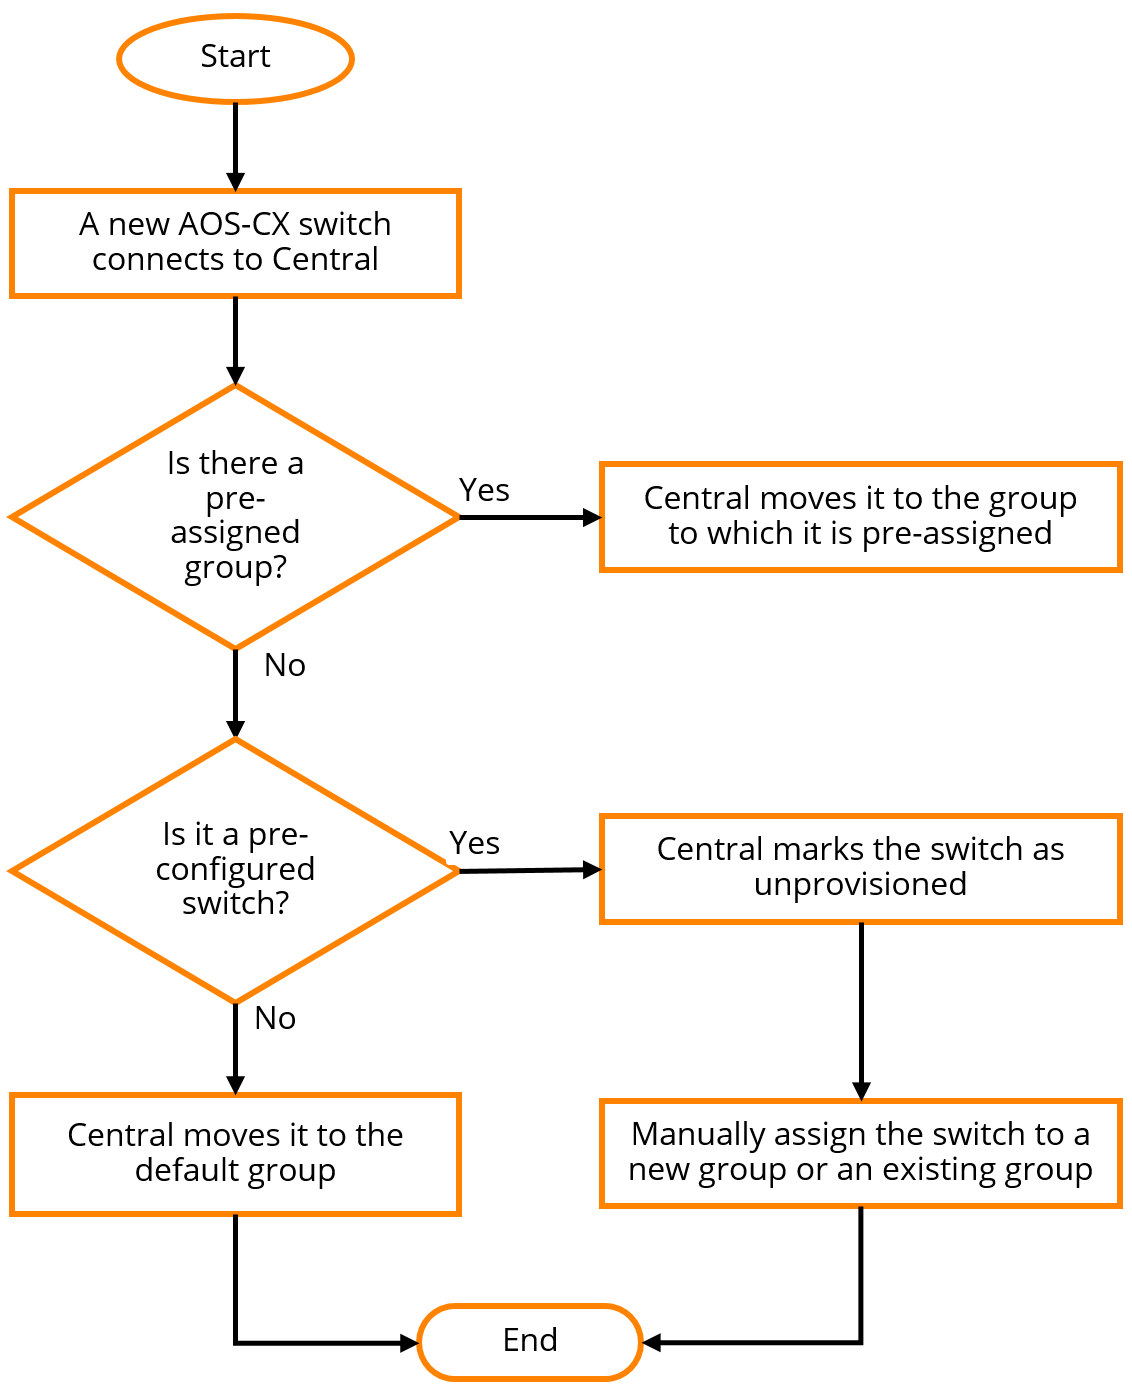
Group Assignment
Aruba Central (on-premises) supports provisioning AOS-CX switches in template groups. Template groups allow you to configure devices using CLI-based configuration templates.
The following figure illustrates the group assignment workflow in Aruba Central (on-premises):
Figure 1 Group Assignment-AOS-CX Switches
AOS-CX Switch Configuration
Aruba Central (on-premises) supports managing AOS-CX switches configuration using configuration templates and UI group configuration.
When an AOS-CX switch is connected to Aruba Central (on-premises) and managed using the Network Operations app, Aruba Central (on-premises) becomes the single source of configuration for the switch. In the Aruba Central (on-premises) Manged mode, the switch cannot be configured using any of the other switch configuration interfaces, such as the switch CLI, RESTRepresentational State Transfer. REST is a simple and stateless architecture that the web services use for providing interoperability between computer systems on the Internet. In a RESTful web service, requests made to the URI of a resource will elicit a response that may be in XML, HTML, JSON or some other defined format. APIsApplication Programming Interface. Refers to a set of functions, procedures, protocols, and tools that enable users to build application software., NBAPIs, and SNMPSimple Network Management Protocol. SNMP is a TCP/IP standard protocol for managing devices on IP networks. Devices that typically support SNMP include routers, switches, servers, workstations, printers, modem racks, and more. It is used mostly in network management systems to monitor network-attached devices for conditions that warrant administrative attention. . You can use any configuration options available in Aruba Central (on-premises) to configure the AOS-CX switches in the Managed mode. You can use the MultiEdit mode on the UI to run commands on the switch through Aruba Central (on-premises). For information, see Using MultiEdit View for AOS-CX.
The Aruba Central (on-premises) Manged mode is applicable to AOS-CX switches running the firmware version 10.07 or later, and to those switches that have been added to an Aruba Central (on-premises) group. This mode is not applicable to switches in the unprovisioned state.
Configuration Using Templates
Aruba Central (on-premises) supports managing AOS-CX switches configuration using configuration templates. Ensure that you assign the AOS-CX switches to a template group.
When initially onboarding an AOS-CX switch to Aruba Central (on-premises), you must manually create the template for the switch in a group, along with the password in plaintext format. You can use the output of the show running-config command to create the template. You can also add variables to use the same template for onboarding multiple AOS-CX switches.
For more information on managing AOS-CX switches in Aruba Central (on-premises) using templates, see Using Configuration Templates for AOS-CX Switch Management.
Configuration Using UI Groups
Aruba Central (on-premises) supports managing AOS-CX switches configuration using UI groups. You can configure AOS-CX switches that are added to a UI group, using the UI options and MultiEdit mode. You can pre-configure groups in the absence of switches.
For more information on managing AOS-CX switches in Aruba Central (on-premises) using UI group configuration, see Configuring AOS-CX Switches in UI Groups.
AOS-CX Stack Configuration
Aruba Central (on-premises) supports managing AOS-CX switch stacks configuration using UI group configuration and templates.
For more information on managing AOS-CX switch stacks in Aruba Central (on-premises) using UI group configuration, see Configuring AOS-CX VSF Stacks Using UI Groups.
For more information on managing AOS-CX switch stacks in Aruba Central (on-premises) using templates, see Using Configuration Templates for AOS-CX Switch Management.
AOS-CX Switch Monitoring
To view the operation status of switches and health of wired access network:
- In the app, set the filter to one of the options under , , or .
For all devices, set the filter to . Ensure that the filter selected contains at least one active switch.
The dashboard context for the selected filter is displayed.
- Under , click > .
A list of switches is displayed in the view.
-
- Click an AOS-CX switch under .
The dashboard context for the switch is displayed.
- Click an AOS-CX switch under .
For more information, see Monitoring Switches and Switch Stacks.
To view AOS-CX switches in the monitoring pages, you must create a template configuration for the switch with the password in plaintext. See Using Configuration Templates for AOS-CX Switch Management.
Viewing VSX Details
Aruba Central (on-premises) displays information about VSX configuration of AOS-CX switches. For more information, see Switch > VSX.
Viewing Topology Map
In Aruba Central (on-premises), the tab in the site dashboard provides a graphical representation of the site including the network layout, details of the devices deployed and health of the WANWide Area Network. WAN is a telecommunications network or computer network that extends over a large geographical distance. uplinks and tunnels. Aruba Central (on-premises) supports AOS-CX switches to be displayed in the tab. For more information, see Monitoring Sites in the Topology Tab.
To view AOS-CX switches in the topology map, you must create a template configuration for the switch with the password in plaintext. See Using Configuration Templates for AOS-CX Switch Management.
Troubleshooting and Diagnostics
If you are unable to view all details of the AOS-CX switch, then maybe the template configuration was not applied correctly, the password was missing in the template configuration, or the password was not in plaintext. See the audit trail to check the status of the switch. The audit trail should show the device onboarded message for the switch serial number followed by the configuration push and login successful messages. For more information on troubleshooting AOS-CX switch onboarding issues, see Troubleshooting AOS-CX Switch Onboarding Issues.
Configuration Status
The page under > > in the Aruba Central (on-premises) UI displays errors in configuration sync, template configuration, and a list of configuration overrides. For more information, see Viewing Audit Trail.
The page under > > in the Aruba Central (on-premises) UI displays errors in configuration sync, templates, and a list of configuration overrides. For more information, see Using Configuration Status on AOS-CX.
Troubleshooting Tools
To troubleshoot AOS-CX switches remotely, use the tools available under > > . For more information, see Using Troubleshooting Tools.
Actions Drop-down
You can also reboot, connect to the remote console of the switch, or generate a tech support dump for troubleshooting the device, by using the tools available under the drop-down. The drop-down is available in the switch monitoring pages.
The tab displays the various options available for remote administration of the switch. The following options are available:
- —Reboots the switch. See Rebooting Switches.
- —Allows the administrators to generate a tech support dump for troubleshooting the device. See Troubleshooting Aruba Switches.
- —Opens the remote console for a CLI session through SSHSecure Shell. SSH is a network protocol that provides secure access to a remote device. . Ensure that you allow SSH over port 443. The default user ID is admin, but you can edit and customize the user ID. This custom user ID must be mapped to the device. See Opening Remote Console for Switch.
For AOS-CX 8320 and 8325 switch series, you must enable SSH server on the default VRFVisualRF. VRF is an AirWave Management Platform (AMP) module that provides a real-time, network-wide views of your entire Radio Frequency environment along with floor plan editing capabilities. VRF also includes overlays on client health to help diagnose issues related to clients, floor plan, or a specific location.. Add the ssh server vrf default code to the template.
If the Copy and Paste function from the keyboard shortcut keys (CTRL+C and CTRL+V) do not work in your web browser, use the Copy and Paste functions available under the menu options in the web browser.
